How to Configure VLANs and Trunk Ports on Juniper Switch
 Suresh Thapa
In this blog, we’ll walk through how to configure VLANs, Access Ports, and Trunk Ports on Juniper switches using JunOS CLI commands.
Virtual LANs (VLANs), by definition, divide a LAN’s broadcast environment into isolated virtual broadcast domains, thereby limiting the amount of traffic flowing across the entire LAN and reducing the possible number of collisions and packet retransmissions within the LAN. For example, you might want to create a VLAN that includes the employees in a department and the resources that they use often, such as printers, servers, and so on.
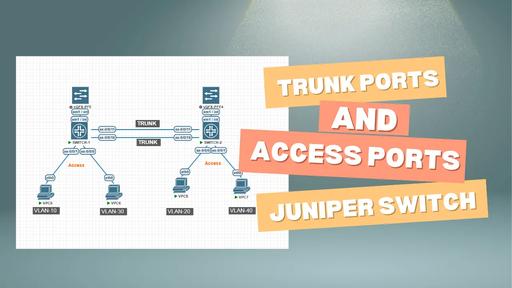
Lab Overview
We'll create and assign the following VLANs:
| VLAN ID | Name |
|---|---|
| 10 | MANAGEMENT |
| 20 | ADMIN |
| 30 | IT |
| 40 | ACCOUNTS |

Access Port Assignments:
SWITCH-1
xe-0/0/0→ VLAN 30 (ADMIN)xe-0/0/1→ VLAN 10 (MANAGEMENT)
SWITCH-2
xe-0/0/0→ VLAN 20 (IT)xe-0/0/1→ VLAN 40 (ACCOUNTS)
Trunk Port Assignments on Switch-1 and Switch-2:
xe-0/0/10→ Allow all VLANsxe-0/0/11→ Allow VLANs 10, 20, and 40
VLAN Configuration
Use the following commands to create VLANs on both the Switches:
set vlans MANAGEMENT vlan-id 10
set vlans ADMIN vlan-id 20
set vlans IT vlan-id 30
set vlans ACCOUNTS vlan-id 40
Access Port Configuration
To configure ge-0/0/0 and ge-0/0/1 as access ports on SWITCH-1:
set interfaces xe-0/0/0 unit 0 family ethernet-switching port-mode access
set interfaces xe-0/0/0 unit 0 family ethernet-switching vlan members ADMIN

set interfaces xe-0/0/1 unit 0 family ethernet-switching port-mode access
set interfaces xe-0/0/1 unit 0 family ethernet-switching vlan members MANAGEMENT
To configure ge-0/0/0 and ge-0/0/1 as access ports on SWITCH-1:.
set interfaces xe-0/0/0 unit 0 family ethernet-switching port-mode access
set interfaces xe-0/0/0 unit 0 family ethernet-switching vlan members IT

set interfaces xe-0/0/1 unit 0 family ethernet-switching port-mode access
set interfaces xe-0/0/1 unit 0 family ethernet-switching vlan members ACCOUNTS
Trunk Port Configuration
Option 1: Allow All VLANs on a Trunk Port
set interfaces xe-0/0/10 unit 0 family ethernet-switching port-mode trunk
set interfaces xe-0/0/10 unit 0 family ethernet-switching vlan members all
Option 2: Allow Specific VLANs on a Trunk Port
set interfaces xe-0/0/11 unit 0 family ethernet-switching port-mode trunk
set interfaces xe-0/0/11 unit 0 family ethernet-switching vlan members [MANAGEMENT ADMIN ACCOUNTS]
Verification Commands
View VLANs and their member ports:
show vlan
Verify trunk ports and their status:
show ethernet-switching interfaces detail | match trunk
Interface: ge-0/0/10.0, Index: 66, State: up, Port mode: Trunk
Interface: ge-0/1/11.0, Index: 114, State: up, Port mode: Trunk
Conclusion
Using the above configuration, your Juniper switch will have properly segmented VLANs with designated access and trunk ports. This setup is foundational for scalable, secure network design.